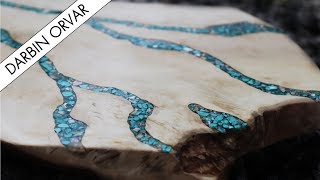
Epoxy Resin Turquoise Stone River Style Board
Epoxy Resin Turquoise Stone River Style Board

Meet up on Saturday Jul 13th, 2019, 9 am – Noon at Woodcraft in Richmond VA. Address: 9862 W Broad St, Glen Allen, VA 23060
I got the holly wood from Hackett’s Lumberyard: https://www.instagram.com/hackettenterprises
Products I used for this project: (affiliate)
Total Boat Epoxy – https://amzn.to/2LKSUir
Rockler Project Mat – https://amzn.to/2XAUbe7
Turquoise Stones – https://amzn.to/2YJ1fa2
Seashells – https://amzn.to/2JzAChc
Ryobi Router – https://amzn.to/30qDZxX
Grizzly Jigsaw – https://amzn.to/2LKU8Ky
Triton Belt Sander – https://amzn.to/2S4n0ym
Shellac – https://amzn.to/30oG1yE
Sign up for my free newsletter! http://www.darbinorvar.com/newsletter/
Mailing Address:
Darbin Orvar
PO BOX 1101
Goochland, VA 23063
How to find Linn @ Darbin Orvar
http://patreon.com/darbinorvar
http://youtube.com/darbinnotes – My Second Channel
Tweets by darbinorvar
http://instagram.com/darbinorvar
http://darbinorvar.com/podcast – Check out all the Podcasts!
Camera & Gear Links (Some are newer versions)
DJI Spark – https://amzn.to/2FmpQHi
Rode Pro Mic – http://amzn.to/2xTXrW8
Canon 80D – http://amzn.to/2zbFLXw
Canon Rebel SL2 – https://amzn.to/2GTR8ue
Canon 10-18mm – http://amzn.to/2ipJqZP
Canon 50mm 1.4 – http://amzn.to/2xSuoSF
Tamron 17-50 – http://amzn.to/2xRZpGp
Sony Movie Studio – http://amzn.to/2iqHoIE
Wacom Tablet – http://amzn.to/2xSRDfm

It almost looks like marbel, it’s really a very beautiful project ❤️
This is beautiful! I love contrast of the wood and the turquoise stone, plus the finish really highlights the natural tones of the wood
belle planche à découper.
Very nice, thanks for the video. You said you’ve stopped sanding at 220 grit, but what grit did you start with until you went down to 220?
Does the shellac effectively make scratches disappear from the epoxy?
What grit sandpaper do you use for the belt sander? I’m doing something similar and just snapped my belt : (
I like all your projects ! Very well!
nice, if a little reminiscent of kindergarten.. probably just the seashells
I really like your grooves method and type of material to fill them with! Excellent!
good video, ennoying music 🙁
Stunning, I think it would like nice in a washroom. Not sure where though.
Wow! It’s beautiful!
Does the finish make the epoxy shine after sanding it? How is it so clear after only 200 grit
I really like the look with the filed/sanded stone, phenomenal!
Nicely done!
I think it looks great. I really like it.
Really interesting technique! You gave me a lot of inspiration with this one! Thanks for sharing!
I would have made the inlay in the shape of the Thames river in London England.
Maybe try a diamond cup disc on the angle grinder to knock down the high spots?
Maybe a deeper router groove would have been better then epoxy would be easier to sand down cool look eitherway
Nice to see work not relying on mega-scale hardware. Back to your roots without product placement. Nice!
Love it!
I think I would have placed all of the stones and shells first and then poured the epoxy.
Hola…como siempre un muy buen y lindo trabajo….felicitaciones
Lovely. Crushing up the turquoise and mixing it with the stone and shells was a great idea. How much does the finished piece weigh?
Hi. HAVE YOU SEEN THE VIDEO ON SANDING STONES OR LIKE CALLED POPS SHED ON U.TUBE..LIKE WHAT YOU DONE LOOKS REAL NICE..DAVID N.S.W. AUSTRALIA….
Bet we see one of the guitar makers give this technique a try very soon – the finished project just screams ‘Stratocaster’ at me. Anybody else?
Very interesting project. Thanks for sharing!
Yes, the contrast between the wood and the turquoise is really strikingly beautiful : )
Very cool project.
Very cool!
Can I just use shellac after a fine sanding and it will polish it? That’s how its portrayed in this video
God job
From Iraq
use an angle grinder to cut down the stones. then go to the belt sander.
Really gorgeous
super cool, love it
where did you buy the turquoise stones?
Nice work, looks great.
Turned out quite nice. Jack plane, my favorite flattening tool. It’s a workout, but very satisfying.
Beautiful
Nice work! I was researching turquoise inlay with resin but for lapidary cabochon or jewelry purposes and came across your vid, really cool! That “turquoise” is dyed Howlite which is a soft white stone stabilized and dyed, this is a great use for it since it’s so much cheaper than real turquoise (don’t get acetone on it, color usually bleeds).. way better use for it than using Howlite imitation turquoise in actual jewelry!
Nice work, looks great.
This turned out really cool! Great job!
I would like to say, though, that people generally opt for haste because they don’t want to spend the necessary time to do something carefully and then they end up spending a lot of time in post processes just to make up for the haste. The lesson is: A lack of patience when beginning a project charges interest, in terms of time, in the end. It really can take more time to fix the mistakes made in haste than to take the time to do it carefully from the start. I guess it all depends on where you would rather spend your time.
I have found some amazing rocks in my driveway too! Great project Linn 🙂
At the beginnng i thougth, that will look not good. But definitely it turned very very nice, awesome!